Key Takeaways
- Buy and install before you fly. Set up your Vietnam eSIM on home Wi-Fi so you land in Hanoi or Ho Chi Minh City already online.
- One QR code, two lines. Your eSIM runs alongside your home SIM, so you keep your usual number for bank texts while using Vietnamese data for everything else.
- Turn data roaming ON for the eSIM. Most travel eSIM profiles need it, and forgetting this step is the number-one “no data” mistake.
- Plan your data around heavy days. Maps, Grab, and messaging add up fast in alley-heavy districts. Budget 1–2 GB a day for light use, more if you hotspot a laptop.
- One plan can cover the whole trip. If Vietnam is one stop on a wider route, a Telekonek plan keeps you connected across 200+ countries without reinstalling at each border.
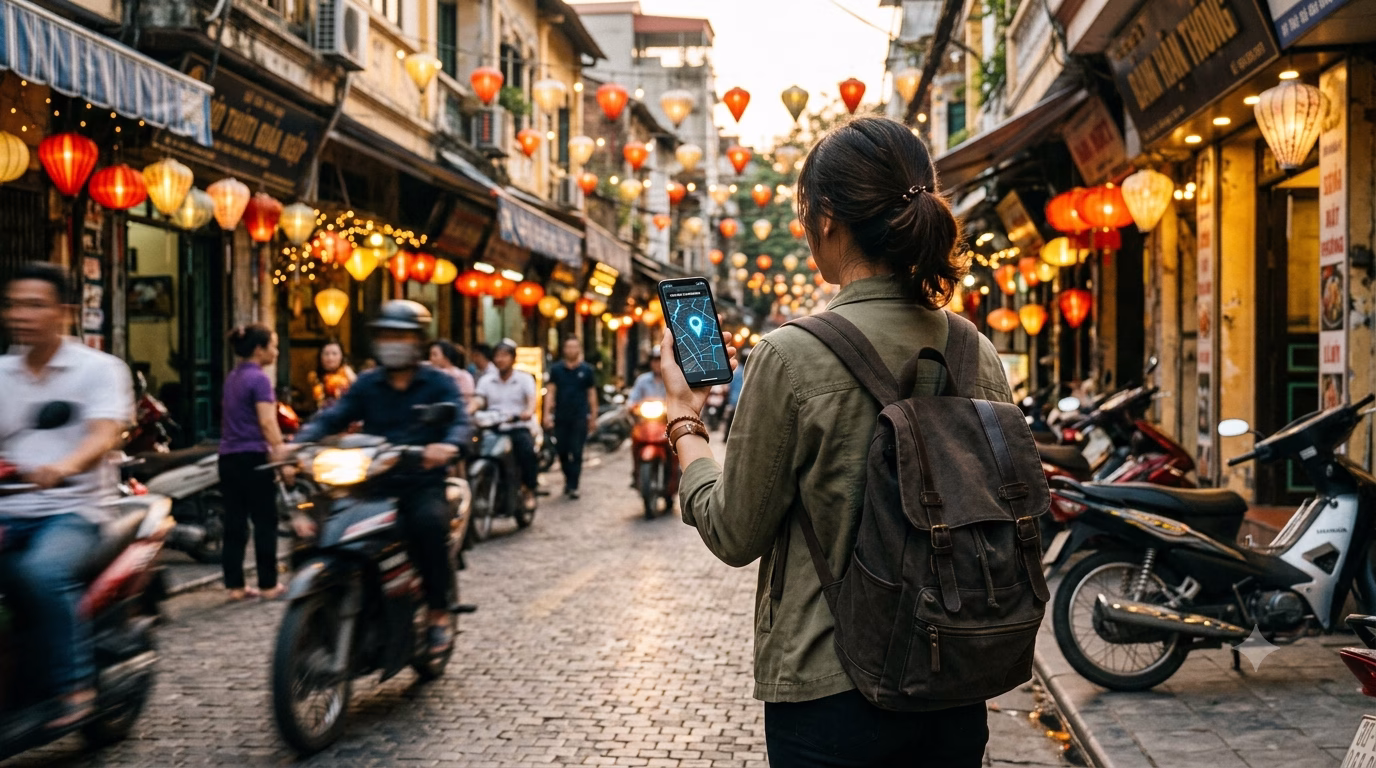
What an eSIM Is and Why It Works So Well in Vietnam
An eSIM (embedded SIM) is a digital SIM that lives inside your phone—no plastic card, no tiny tray tool, no kiosk stop after a red-eye. Instead of swapping a physical SIM, you scan a QR code (or install through an app), and your phone downloads a carrier “profile” that connects you to Vietnamese mobile networks the moment you land. You’re not buying a chip—you’re buying a downloadable plan you can install before departure or on arrival.
eSIMs suit Vietnam especially well because your first hour on the ground often depends on data. Ride-hailing (Grab), translation, map pins in Hanoi’s Old Quarter, and cashless payments at cafés in Ho Chi Minh City can all fall apart without a connection. Activate your Telekonek Vietnam eSIM before wheels-down and you can message your hotel, pull up the pickup point at Tân Sơn Nhất (SGN) or Nội Bài (HAN), and skip the airport Wi-Fi scramble. If Vietnam is just one stop on a wider Southeast Asia route, the same plan works across 200+ countries.
On your phone, the eSIM becomes a second line alongside your home SIM. You can keep your regular number active for bank SMS and 2FA while using Vietnamese data for everything else. On most iPhones (XS and newer) and many Android flagships (Google Pixel, Samsung Galaxy S/Note/Z series), you’ll see an “Add eSIM” option, and you can label the lines “Home” and “Vietnam” to avoid mix-ups. Not sure about your handset? It’s worth a quick check of whether your phone supports eSIM before you buy.
- Convenience: No hunting for a mobile shop on Lê Lợi in District 1 after a late arrival. Install at your hotel on Wi-Fi, or before boarding.
- Cost control: You pick a fixed data allowance and avoid surprise roaming bills—often far less than hotel “emergency roaming,” which can run $10–$15/day depending on your home carrier (2026).
- Flexibility: Top up or switch plans without swapping SIMs—handy if you start in Da Nang and later need more data for remote work in Hội An.
Watch out for: not every phone is eSIM-compatible, and most Vietnam travel plans are data-only (no local number for voice calls). Activation also needs a stable connection, so download or scan the eSIM on reliable Wi-Fi (your hotel or an airport lounge) rather than a crowded terminal network. If you rely on app-based OTPs or bank texts, keep your home SIM on for SMS while setting your Telekonek eSIM as the default for mobile data.
Choosing the Right Vietnam eSIM Plan
Picking your eSIM is a bit like picking transport in Vietnam: look past the headline price at coverage, speed consistency, and how easy it is to activate when you’re jet-lagged. Vietnam is a phone-first country—Grab rides, QR payments in cafés, Google Maps down alleyway addresses, and translation in markets all hinge on data—so staying connected isn’t a “nice to have,” it’s the difference between a smooth day and a logistical mess.
Your Telekonek eSIM runs on Vietnam’s major mobile networks—the same infrastructure behind carriers like Viettel, Vinaphone, and MobiFone—so you get nationwide coverage from city centers to coastal towns. Typical travel-plan pricing sits in the ~US$5–$25 range depending on days and data size (2026), with activation you can handle before you land so you’re online the moment you step into arrivals.
The main decision is simply how wide your trip is:
- Vietnam-only plan: Best value-per-GB if you’re staying in Vietnam. Check the validity window (7/15/30 days) and remember most travel plans are data-only.
- Regional Southeast Asia plan: Costs a little more but saves you from buying again if you add Cambodia or Thailand. Ideal for multi-border trips where you don’t want downtime at land crossings.
- Global plan: A touch pricier per GB, but convenient for frequent flyers—keep one Telekonek account for Vietnam now and Europe later, and top up as you go.
Coverage and speed: In the big cities (HCMC District 1/3, Hanoi Old Quarter and West Lake, Da Nang’s beach strip), your data will feel fast enough for maps and rides. The real test is long-distance—night trains, the Ha Giang Loop, Phong Nha countryside, or islands—where signal naturally thins out. That’s where a plan tied to the main national networks, rather than a patchy partner signal, earns its keep.
Plan features that matter more than people think:
- Hotspot/tethering: If you’ll work from a laptop in a Hội An café or share data with a travel partner, confirm hotspot is allowed. Telekonek plans support tethering, so you’re covered.
- Add-ons/top-ups: A cheap 7-day plan is frustrating if you can’t extend it and have to reinstall mid-trip. Telekonek lets you top up from the dashboard, so you extend without drama.
- Support hours: Activation hiccups tend to land at the worst time—right after touchdown when airport Wi-Fi is overloaded. Responsive chat support can save you an hour in arrivals.
One common mistake: buying a plan, installing it at home, then arriving in Vietnam with no data because roaming wasn’t enabled on the eSIM (or the phone was left on the wrong “data line”). Follow the setup steps below, and test your plan briefly before departure so you know your settings are right.
How to Buy and Install Your Vietnam eSIM, Step by Step
Before you land: do a 2-minute compatibility check. On iPhone, go to Settings → General → About and look for “Digital SIM” or “Available SIM.” On Android, check Settings → Network & Internet → SIMs (wording varies by brand) and confirm “Add eSIM” exists. Make sure your phone is unlocked, too—a common snag for devices bought on a carrier contract back home. If you can’t add an eSIM at home, you won’t be able to in Hanoi either.
Step 1 — Buy your plan while you have stable Wi-Fi. The easiest path is to set up your Vietnam eSIM before your flight. If you’d rather wait until arrival, connect at the first reliable network—a café chain like Highlands Coffee (you’ll find them in HCMC and Hanoi) or your hotel lobby—since airport Wi-Fi can choke during peak landings. Pick a plan that matches your trip length and data needs, and you’re set.
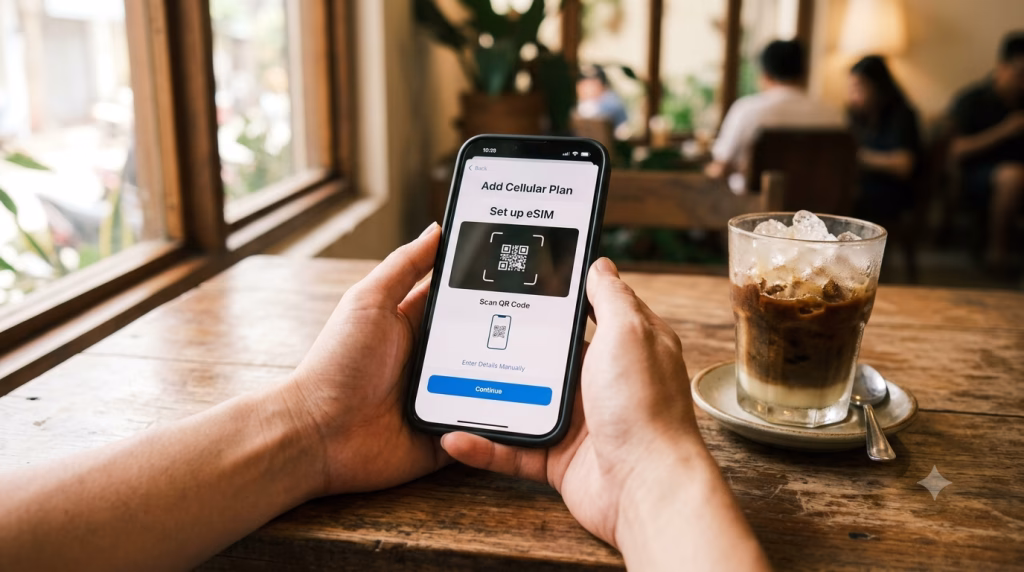
Step 2 — Install the eSIM (QR method is the most reliable). Your QR code arrives by email or inside your account. On iPhone: Settings → Cellular → Add eSIM → Use QR Code. On Android: Settings → Network & Internet → SIMs → Add eSIM. Name it something obvious like “VN Data” so you don’t accidentally burn roaming on your home line later.
Step 3 — Set it up correctly so it works outside the terminal. In Cellular/Mobile Data settings:
- Set Mobile Data to your Vietnam eSIM.
- Turn Data Roaming ON for the eSIM (this is required for most travel eSIM profiles).
- Keep your home SIM on for calls and SMS if you need bank OTP texts, but turn Data Roaming OFF on that line.
If you’re unsure how the roaming toggles interact, this guide on whether to keep data roaming on or off walks through it.
Step 4 — Confirm you’re connected before you leave the pickup area. Open a fast-loading site (Google, Grab) and send a WhatsApp or iMessage. If nothing loads, toggle Airplane Mode for 10 seconds, then back on. Still stuck? Go to Cellular → Network Selection, switch from “Automatic” to manual, and try another listed network. That’s the quickest fix when a phone clings to a weak signal near big concrete terminals.
Watch out for the #1 activation mistake in Vietnam: installing the eSIM on airport Wi-Fi, then forgetting to switch Mobile Data over to it. Everything looks fine until you step outside and your phone starts chewing expensive home roaming. Do the settings check once, then order your first Grab from the curb with confidence.
Where to Buy: Online Before You Fly vs Local Shops on Arrival
You’ve basically got two paths: buy online (before you fly or from hotel Wi-Fi) or sort it out in person after you land. Both work, but they fail in different ways—and Vietnam is the kind of trip where staying connected isn’t optional (Grab pickups in the rain, Google Maps in tiny alleys, banking OTP texts, and translation in markets all depend on data).
Buying online is the low-friction option: you purchase, install, and land with data ready to go. That matters at big arrival choke points like Tân Sơn Nhất (SGN) and Nội Bài (HAN), where airport Wi-Fi bogs down right when everyone’s trying to book a ride. Setting up your eSIM in advance also means you skip the setup process again if Vietnam is one leg of a bigger Southeast Asia trip.
- Online pros: activate before landing, avoid queues, clearer plan details (data size, validity days), and easy top-ups if you run low mid-trip.
- Online cons: you need an eSIM-capable, unlocked phone, and first-time setup can feel fiddly without good Wi-Fi.
Buying locally can mean airport mobile counters or phone shops in the city. It’s appealing if you want a human to help, especially if you’re nervous about scanning QR codes and toggling settings. In central areas like District 1 (HCMC) or the Old Quarter (Hanoi), you’ll find plenty of phone accessory stores that can walk you through it—just don’t expect every shop to be patient when there’s a queue behind you.
- Local-shop pros: hands-on help, you can test connectivity on the spot, and it’s a fallback if you arrive with a locked phone.
- Local-shop cons: time cost (travel and waiting), vaguely explained plans, and counters that push bundles you don’t need.
Watch out for: kiosks or small shops that quote one price verbally, then add “activation,” “setup,” or “VAT” fees at payment. And if someone insists on holding your passport longer than necessary or taking photos beyond what’s required, walk away—there’s always another shop. For the least hassle, buy your eSIM online while you still have stable Wi-Fi, install it, and keep a screenshot of your QR code and plan details so you’re not scrambling at baggage claim. For a city-by-city look at coverage, our guide to staying connected across Vietnam’s top spots goes deeper.
Staying Connected as You Travel Across Vietnam
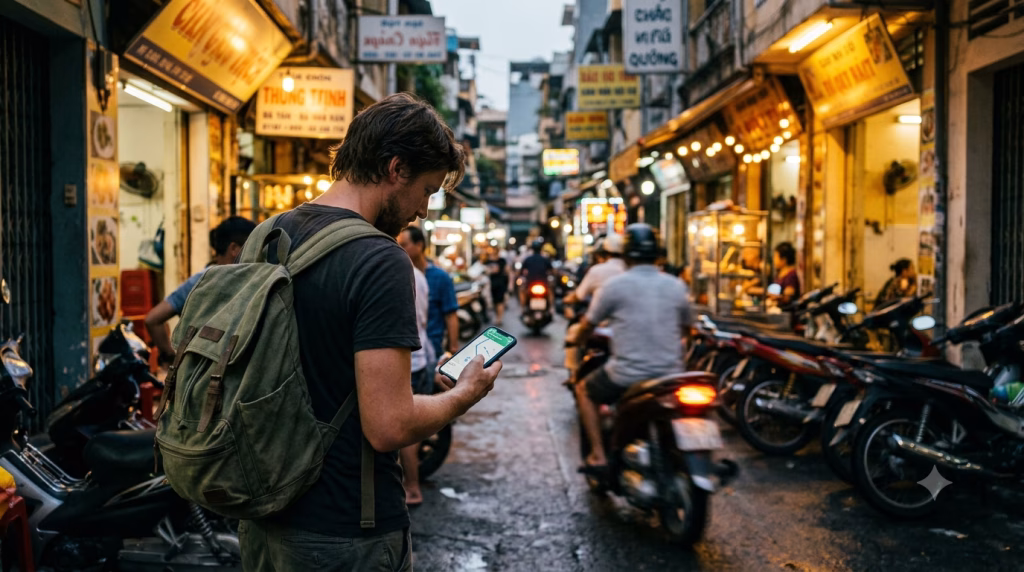
Once your eSIM is installed, the trick is using it like a tool, not just “having data.” In Hanoi’s Old Quarter, Ho Chi Minh City’s alley-heavy District 1, and beach towns like Da Nang where addresses don’t always pin cleanly, you’ll lean on maps, Grab, and messaging constantly. A Telekonek plan stays predictable across the country, and if Vietnam is one stop on a longer route, you won’t have to redo everything at each border.
Set your phone up before you leave hotel Wi-Fi. The moment you step into a humid street with traffic noise, fiddling with settings becomes a headache. On iPhone: Settings → Cellular → select your eSIM line → turn on Data Roaming and set Cellular Data to the eSIM. On Android: Settings → Network & Internet → SIMs → choose the eSIM → enable mobile data and roaming (wording varies).
- Keep your home SIM on for OTP texts, but stop it eating money: set the home line to “Voice only,” turn off Data Roaming on it, and disable “Allow Cellular Data Switching” (iPhone) so it doesn’t silently jump networks.
- Download offline backups: save Google Maps offline for “Hà Nội,” “Đà Nẵng,” and “TP. Hồ Chí Minh,” plus your hotel area. When you’re down a narrow hẻm (alley), GPS and cached maps still get you out.
Manage data like a local. Vietnam’s cafés often have Wi-Fi, but it slows at peak hours (especially in coworking-style spots around Thảo Điền or near Bùi Viện), so assume you’ll spend more mobile data than you expect. For a typical 2026 trip, budget roughly:
- 1–2 GB/day: maps + Grab + WhatsApp/Telegram + light browsing
- 3–5 GB/day: lots of TikTok/Instagram + frequent photo uploads
- 5+ GB/day: hotspotting a laptop, video calls, or constant streaming
To keep usage under control, set a data warning (iPhone: Settings → Cellular; Android: data warning/limit), turn off iCloud/Google Photos uploads on cellular, and push big backups over hotel Wi-Fi. For overnight trains or long rides (like Hanoi ↔ Sapa routes), pre-download Spotify and Netflix—signal dips in mountain stretches. Planning around the seasons helps too; here’s the best time to visit Vietnam and how crowds affect connectivity.
Watch out for the “my eSIM doesn’t work” moment: you land, it shows bars, but nothing loads because the APN didn’t populate or your phone clung to a weak network. Quick fix: toggle Airplane Mode for 10 seconds, then manually reselect the network in Cellular/Mobile Network settings. Arriving at SGN or HAN during a busy bank of flights? Step away from the curb chaos, connect once, then order your Grab—drivers cancel fast if they can’t reach you.
Troubleshooting Common eSIM Issues in Vietnam
Most “eSIM problems” in Vietnam aren’t Vietnam-specific—they’re phone settings, timing, or a weak Wi-Fi install. But since you’ll lean on data for Grab pickups at SGN/HAN, Google Maps in Old Quarter alleys, and bank or booking logins, fixing them fast matters. A Telekonek plan is straightforward to re-check and re-toggle on the road, and it carries over if Vietnam is one stop on a longer loop.
Issue #1: “No Service” or stuck on SOS after activation. Usually one of three things: the eSIM line isn’t turned on, data roaming is off, or your phone latched onto the wrong network after landing.
- iPhone: Settings → Cellular → select your Vietnam eSIM → toggle Turn On This Line, set Data Roaming ON, and set Cellular Data to the eSIM.
- Android: Settings → Network & Internet → SIMs → choose the eSIM → enable SIM + Mobile data + Roaming.
- Quick reset: toggle Airplane Mode for 10 seconds, then restart. In HCMC’s District 1 towers, a phone will “hold onto” a weak signal until a reboot forces a clean attach.
Issue #2: Installed, but no data even though bars show. Check your APN first—especially on Android, which can keep an old APN from a previous SIM and silently break data.
- Android APN path: Settings → Network & Internet → SIMs → Access Point Names. If Telekonek provided an APN in the install email or app, copy it exactly (no extra spaces).
- iPhone: APN is usually automatic; if it’s not working, remove and re-add the eSIM (see Issue #5) rather than hunting menus iOS doesn’t expose.
- Test smarter: open a browser and load neverssl.com. It sidesteps the captive-portal weirdness that can make you think data is dead when it’s just a login page.
Issue #3: eSIM won’t install (QR fails / “Unable to Activate”). The most common cause in Vietnam is trying to install on unstable airport Wi-Fi while a dozen flights land at once.
- Fix: install from stable Wi-Fi at your hotel or café (Highlands Coffee is reliable in most big cities), or use a friend’s hotspot.
- What goes wrong: people scan the QR repeatedly. Some profiles lock after multiple attempts—wait a few minutes, then try once on solid Wi-Fi.
- Also check: your phone is carrier-unlocked. A locked device can show the eSIM menu but still refuse activation.
Issue #4: Data works, but it’s slow in specific places (especially indoors). Coverage is generally good, but thick concrete buildings and basement cafés in Hanoi and HCMC can crush signal.
- Try manual network selection: set Network Selection to manual, test another available network, then revert to automatic once you’re moving.
- Force LTE/4G: in some pockets, phones cling to a weak 5G indicator that performs worse than solid 4G.
- Reality check: around HCMC’s Ben Thanh area at peak hours, congestion happens—download offline maps for your day route before you head out.
Issue #5: You deleted the eSIM by mistake (or switched phones). This one stings, because re-scanning endlessly rarely helps.
- Before deleting: screenshot or save your activation details offline (Notes app) so you’re not searching email with no data.
- If it’s gone: don’t keep generating random installs—use Telekonek’s support flow to reissue the profile, ideally over hotel Wi-Fi so you reinstall cleanly in one go.
Issue #6: iMessage/WhatsApp confusion and missed OTPs. Many Vietnam eSIMs are data-only, so you won’t get SMS to that line. Keep your home SIM active for incoming texts (or move OTPs to an authenticator app before you fly), while setting Cellular Data to the eSIM and disabling “Allow Cellular Data Switching” if your phone keeps flipping back.
eSIM vs Local SIM Card: Which Should You Pick?
A local physical SIM can be the better option in Vietnam—but only in a few specific cases. The trade-off is friction vs flexibility: an eSIM (installed in minutes) is about landing ready-to-go, while a local SIM is about a Vietnamese phone number for calls and SMS.
A local SIM makes sense if you need a VN number—for delivery couriers calling you, older hotels that confirm by SMS, or certain local services. In tourist areas, you’ll find carrier shops and phone stalls around Hanoi’s Old Quarter (Hàng Bông/Hàng Gai), HCMC District 1 near Bùi Viện, and malls like Vincom Center Đồng Khởi. A tourist SIM bundle in 2026 runs roughly 150,000–300,000 VND depending on data and validity; smaller street stalls may look cheaper but can be a gamble on what you actually get.
An eSIM wins when you don’t want errands. If you’re arriving into SGN or HAN late, or heading straight to a bus or train, skipping the kiosk matters—you’ll need data immediately for Grab pickup zones, Google Maps in alley addresses, translation, and booking logins. A Telekonek travel eSIM is the practical default here, and it stretches across 200+ countries if Vietnam is one stop on a bigger route.
- Choose a local SIM if: you need a VN phone number, you’ll stay 30+ days, and you’re okay spending 30–60 minutes in a shop with passport registration.
- Choose an eSIM if: you want activation before landing, you’re doing multi-city travel (Hanoi → Huế → Đà Nẵng → HCMC), and you want to keep your home SIM active for OTP texts.
Watch out for: street-stall “unlimited data” SIMs that throttle hard after a small cap, and SIMs sold pre-activated under someone else’s registration. If the seller won’t register it to your passport or can’t show the plan terms on-screen, walk away—use a proper carrier store, or stick with an eSIM you install yourself on secure Wi-Fi.
Frequently Asked Questions About eSIMs for Vietnam Travel
Q: Should I buy my Vietnam eSIM before I fly or after I land?
Buy before you fly if you want your phone working the moment you step into SGN/HAN arrivals (Grab pickup zones are chaotic when you’re offline). Buying after landing can work, but you’re betting on crowded airport Wi-Fi and your patience while tired. If you’re transiting through another country first, setting up in advance also prevents the “no data during the layover” problem.
Q: Will an eSIM give me a Vietnamese phone number for SMS/OTP?
Most travel eSIMs are data-only, so you typically won’t get a VN number for local calls or SMS. That’s usually fine, because Grab, Zalo, WhatsApp, and hotel communication all run on data—but watch out for banking OTP texts tied to your home SIM. Keep your home SIM active as a secondary line for critical SMS, or move OTP delivery to an authenticator app before departure.
Q: Can I use an eSIM and my physical SIM at the same time?
Yes—on most modern phones you can run dual SIM (eSIM + physical). The practical setup is eSIM for data, home SIM for calls and SMS, with data roaming OFF on your home line to avoid surprise charges. On iPhone, double-check Cellular Data is set to the eSIM, and turn on Allow Cellular Data Switching only if you actually need automatic fallback.
Q: What plan size do I need for Vietnam?
Vietnam is deceptively data-hungry, since you’ll stream maps constantly in alley-heavy areas and use photo and video messaging all day. Use the same per-day tiers as above—1–2 GB/day for light use (maps, messages, occasional browsing), 3–5 GB/day for typical travel (Grab, Maps, social, some video), and 5+ GB/day if you hotspot a laptop or stream a lot—then multiply by your trip length and add a small buffer. One or two video calls can chew through a gigabyte on their own.
Q: What phones won’t work with an eSIM in Vietnam?
Two common gotchas: carrier-locked phones (especially devices still on contract back home) and regional models that don’t support eSIM even when the “same” phone does elsewhere. Some older or region-specific Android variants lack eSIM entirely. Confirm you see an “Add eSIM” option in settings before you pay, and update your OS—outdated software can hide eSIM menus.
Q: What if installation fails when I’m already in Vietnam?
Most failures are fixable in five minutes if you know what to toggle. Try, in order: switch to stable Wi-Fi (hotel Wi-Fi often beats airport), turn on airplane mode for 10 seconds, restart the phone, then re-check that the eSIM line is enabled and set for data. If you’re stuck, don’t delete the eSIM profile right away—many travelers delete first and regret it when they realize they need the original QR and activation details again.
Q: Does an eSIM work everywhere—Hà Giang Loop, Phú Quốc, small islands?
In major cities (Hanoi, HCMC, Da Nang), coverage is usually strong. On mountain routes like the Hà Giang Loop, you’ll hit dead zones between towns, and islands can see weaker indoor reception. The move is to download offline maps and pin key locations (hotel, bus stop, viewpoint) before you ride out. Save bookings as PDFs or screenshots, too—signal tends to drop at the exact moment you need an address.
Q: Is it safe to buy eSIMs from random kiosks or online listings?
Be careful with “too cheap to be true” listings and unofficial sellers promising unlimited data. What goes wrong in practice: throttled speeds after a tiny “fair use” cap, QR codes that have already been used, or zero support when activation fails. Stick to a reputable provider with clear plan terms and a straightforward activation flow so you’re not negotiating connectivity at midnight in a hotel lobby.
Before you fly, install your Vietnam eSIM on reliable home Wi-Fi, then land with Grab, Maps, and messaging already working—it removes the most stressful first-hour problem in Vietnam. Pair that with offline maps and screenshot backups, and you’ll stay functional even when coverage drops in the mountains or on the coast.